Embark on a journey into the world of conversational AI with this comprehensive guide on how to code chatbot integration with Messenger. This exploration delves into the fascinating realm of creating interactive and engaging chatbots that seamlessly interact with users on the Messenger platform.
From understanding the fundamental concepts and benefits of chatbot integration to navigating the technical intricacies of coding and deployment, this guide equips you with the knowledge and skills needed to build your own Messenger chatbot. We’ll explore platform selection, developer account setup, coding logic, feature implementation, and advanced techniques, ensuring a thorough understanding of the entire process.
Introduction to Coding Chatbot Integration with Messenger
Integrating a chatbot with Messenger empowers businesses and individuals to automate conversations, provide instant customer service, and enhance user engagement. This integration leverages the widespread reach of Facebook Messenger, offering a direct channel for interaction. The process involves coding a chatbot application that can communicate with users within the Messenger platform, providing a seamless and interactive experience.
Core Concept of Chatbot Integration
The core concept involves creating a software program, the chatbot, that interacts with users through Messenger. This program receives user input, processes it, and generates responses. The chatbot utilizes natural language processing (NLP) and machine learning (ML) to understand user queries and provide relevant information or complete tasks. The integration relies on the Messenger Platform API, which allows developers to build and deploy chatbots that can send and receive messages, handle user interactions, and integrate with external services.
Benefits of Using Chatbots on Messenger
Chatbots on Messenger offer several advantages for businesses and individuals. They provide 24/7 availability, allowing users to receive instant support and information at any time. This can significantly improve customer satisfaction by reducing wait times and providing immediate answers to common questions. Furthermore, chatbots can automate tasks such as order processing, appointment scheduling, and lead generation, freeing up human agents to focus on more complex issues.
The use of chatbots can also lead to cost savings by reducing the need for extensive customer service teams.
- Improved Customer Service: Chatbots can provide instant responses to frequently asked questions, guiding users through various processes.
- Increased Engagement: Chatbots can proactively engage with users, providing personalized recommendations, updates, and promotions.
- Automation of Tasks: Chatbots can automate repetitive tasks, such as booking appointments, processing orders, and collecting user data.
- Cost Reduction: By automating customer service and other tasks, chatbots can help businesses reduce operational costs.
- Data Collection and Analysis: Chatbots can gather valuable data about user behavior and preferences, which can be used to improve products and services.
Real-World Examples of Successful Messenger Chatbot Implementations
Numerous businesses have successfully implemented chatbots on Messenger to enhance their customer service and marketing efforts. These examples illustrate the diverse applications and potential benefits of chatbot integration.
- E-commerce: Many e-commerce businesses use chatbots to provide product recommendations, answer customer inquiries, and facilitate order tracking. For example, Sephora’s Messenger chatbot allows users to book appointments, get personalized product recommendations, and participate in quizzes.
- Healthcare: Healthcare providers are leveraging chatbots to provide appointment scheduling, answer medical questions, and deliver health-related information. The “HealthTap” chatbot provides users with medical information and connects them with doctors.
- Travel: Travel companies utilize chatbots to assist with booking flights, hotels, and providing travel recommendations. KLM Royal Dutch Airlines’ Messenger chatbot allows users to check flight statuses, receive boarding passes, and manage their bookings.
- News and Media: News organizations use chatbots to deliver breaking news, personalized content, and interact with readers. CNN’s Messenger chatbot provides users with news updates, allows them to explore different topics, and offers interactive polls.
Choosing the Right Chatbot Platform
Selecting the appropriate chatbot platform is a crucial step in successfully integrating a chatbot with Messenger. The right platform will streamline development, enhance user experience, and align with your business objectives. This section Artikels key factors to consider when choosing a chatbot platform and provides a comparative analysis of popular options.
Factors to Consider for Platform Selection
Several factors influence the selection of the most suitable chatbot platform. These considerations ensure the chosen platform aligns with your specific requirements and facilitates a successful chatbot integration.
- Ease of Use: Evaluate the platform’s user interface, development tools, and overall learning curve. Platforms with intuitive interfaces and drag-and-drop functionality are generally easier for beginners.
- Features and Functionality: Assess the platform’s capabilities, including natural language processing (NLP), integrations with other services (e.g., CRM, payment gateways), and support for rich media (images, videos, carousels).
- Scalability: Consider the platform’s ability to handle increasing user traffic and data volume as your chatbot grows. The platform should be able to scale to accommodate more users and interactions.
- Pricing: Review the platform’s pricing models, including subscription fees, transaction costs, and any limitations on usage. Choose a pricing plan that aligns with your budget and expected usage.
- Integrations: Determine the platform’s ability to integrate with other services you use, such as CRM systems, e-commerce platforms, and customer support software. Seamless integration simplifies workflows and data exchange.
- Analytics and Reporting: Examine the platform’s analytics capabilities, including the ability to track key metrics like user engagement, conversation flows, and conversion rates. Robust analytics provide valuable insights for optimization.
- Customization Options: Consider the level of customization offered by the platform. Some platforms provide greater flexibility in terms of branding, design, and bot behavior than others.
- Support and Documentation: Assess the availability of support resources, including documentation, tutorials, and customer support channels. Comprehensive support is crucial for troubleshooting and resolving issues.
Comparison of Popular Chatbot Platforms
The market offers various chatbot platforms, each with its own strengths and weaknesses. The following table provides a comparative overview of several popular platforms, focusing on their features, pricing, and ease of use. This comparison facilitates informed decision-making when selecting a platform.
| Platform | Features | Pricing | Ease of Use |
|---|---|---|---|
| ManyChat |
|
|
|
| Chatfuel |
|
|
|
| Dialogflow (Google) |
|
|
|
| Botpress |
|
|
|
No-Code vs. Code-Based Chatbot Platforms
Chatbot platforms are broadly categorized into no-code and code-based options. Each approach offers distinct advantages and disadvantages, impacting the development process, customization options, and required technical expertise. Understanding these differences enables you to choose the platform that best aligns with your project requirements.
- No-Code Platforms: These platforms offer visual interfaces and drag-and-drop functionality, enabling users to build chatbots without writing code. They are generally easier to use and require less technical expertise.
- Code-Based Platforms: These platforms provide more flexibility and customization options but require coding skills. Developers can build complex chatbots with advanced features and integrations.
Advantages of No-Code Platforms:
- Ease of Use: No-code platforms are generally easier to learn and use, making them accessible to users with limited technical skills.
- Faster Development: The visual interface and pre-built components accelerate the development process, allowing for quicker chatbot deployment.
- Lower Initial Cost: Many no-code platforms offer free or low-cost plans, making them an affordable option for small businesses and individuals.
Disadvantages of No-Code Platforms:
- Limited Customization: No-code platforms often restrict the level of customization, making it challenging to implement highly specific features or complex logic.
- Less Flexibility: The lack of coding capabilities can limit the platform’s ability to integrate with external services or handle complex conversational flows.
- Scalability Issues: Some no-code platforms may struggle to handle large volumes of traffic or complex data processing as the chatbot grows.
Advantages of Code-Based Platforms:
- Greater Customization: Code-based platforms provide extensive customization options, allowing developers to create highly tailored chatbots that meet specific business needs.
- More Flexibility: Developers have complete control over the chatbot’s behavior, enabling them to integrate with any service or system.
- Scalability: Code-based platforms can be designed to handle large volumes of traffic and complex data processing.
Disadvantages of Code-Based Platforms:
- Requires Technical Skills: Developers need to have coding skills and experience with natural language processing (NLP) and chatbot development frameworks.
- Longer Development Time: Building a chatbot from scratch or customizing an existing platform can be time-consuming.
- Higher Initial Cost: Code-based platforms often require more resources, including development time, infrastructure, and ongoing maintenance.
Setting Up a Messenger Developer Account and App
To successfully integrate a chatbot with Messenger, establishing a Facebook Developer account and configuring a Messenger app are essential first steps. This section Artikels the precise process of creating a developer account, setting up a new app, configuring it for Messenger, and obtaining the necessary access tokens and webhooks for seamless communication.
Creating a Facebook Developer Account
Before you can build and deploy a chatbot on Messenger, you need a Facebook Developer account. This account grants access to the tools and resources necessary for app development.To create a Facebook Developer account, follow these steps:
- Navigate to the Facebook Developers website: Go to developers.facebook.com.
- Log in with your Facebook account: If you are not already logged in, you will be prompted to log in using your existing Facebook credentials.
- Accept the terms and conditions: Review and accept the Facebook Developer terms of service.
- Verify your account (if required): Facebook may require you to verify your account via phone number or email address. Follow the on-screen instructions to complete the verification process.
- Set up your developer profile: You may be asked to provide some information about yourself or your organization. Complete your profile as accurately as possible.
Once your Facebook Developer account is created, you are ready to create a new app.
Setting Up a New App
Creating a new app is the next step in integrating your chatbot with Messenger. This app will serve as the container for your chatbot’s functionality.To set up a new app:
- Go to “My Apps” in the Facebook Developers dashboard: After logging in, navigate to the “My Apps” section, typically found in the top-right corner of the developer dashboard.
- Click “Create App”: This will initiate the app creation process.
- Choose an app type: You will be prompted to select an app type. Choose “Consumer” or “Business” based on your intended use. If your chatbot is intended for public use, select “Consumer”. If it is for internal use within a business, choose “Business”.
- Provide app details: Enter the necessary information for your app, including a display name and contact email address. Choose a descriptive name that reflects your chatbot’s purpose.
- Create the app: Click the “Create App” button to finalize the app creation.
After creating your app, you will be directed to the app dashboard.
Configuring a Messenger App and Obtaining Access Tokens
With the app created, the next step is to configure it specifically for Messenger. This involves adding the Messenger product to your app and obtaining the necessary access tokens for your chatbot to interact with users.To configure your app for Messenger and obtain access tokens:
- Add the Messenger product: In your app dashboard, click on “Add Product” and select “Messenger”. This will add the Messenger product to your app.
- Create a Facebook Page (if you don’t have one): You’ll need a Facebook Page to connect your chatbot. If you don’t already have one, create a new page from within the Messenger product settings or separately on Facebook.
- Connect your Facebook Page to your app: In the Messenger settings, select “Add or Remove Pages” and follow the prompts to connect your Facebook Page to your app. This will allow your chatbot to send and receive messages on behalf of your Page.
- Generate a Page Access Token: The Page Access Token is crucial for your chatbot to access the Page’s data and interact with users. In the Messenger settings, you’ll find an option to generate a Page Access Token. Select the Page you want to connect, and Facebook will provide you with a token.
- Obtain an App Secret: In your app dashboard, navigate to “Settings” -> “Basic”. Locate and copy your “App Secret”. This secret is used to authenticate your app and verify requests. Keep this secret secure.
The Page Access Token and App Secret are critical for your chatbot’s functionality. Securely store these tokens. Never share them publicly or embed them directly in your client-side code.
Setting Up Webhooks for Receiving and Sending Messages
Webhooks are essential for real-time communication between your chatbot and Messenger. They enable your app to receive notifications about incoming messages and other events, and to send messages back to users.To set up webhooks:
- Access the Webhooks settings: In your app dashboard, within the Messenger product settings, you’ll find the “Webhooks” section.
- Provide a Callback URL: This is the URL where Facebook will send notifications about events related to your chatbot. This URL should point to a server endpoint that you control and that is capable of handling these notifications.
- Verify the Callback URL: Facebook will send a verification request to your Callback URL. Your server endpoint needs to respond to this request to confirm that you own the URL. This usually involves responding with a challenge code that Facebook provides.
- Specify the Verification Token: You’ll be prompted to enter a verification token. This is a string of text that you define and that will be used to verify that the incoming requests are indeed from Facebook. This token helps secure the communication between your server and Facebook.
- Subscribe to events: Select the events you want to subscribe to. Common events include:
- messages: To receive notifications about incoming messages from users.
- messaging_postbacks: To receive notifications about postbacks (button clicks) from users.
- messaging_optins: To receive notifications about users opting in to receive messages.
- Test your Webhooks: Use the “Test” button in the Webhooks settings to verify that your setup is working correctly. You can also send a test message from the Facebook Page’s inbox to your chatbot and check if your server receives the webhook notification.
Once these steps are completed, your chatbot will be ready to receive and send messages via Messenger.
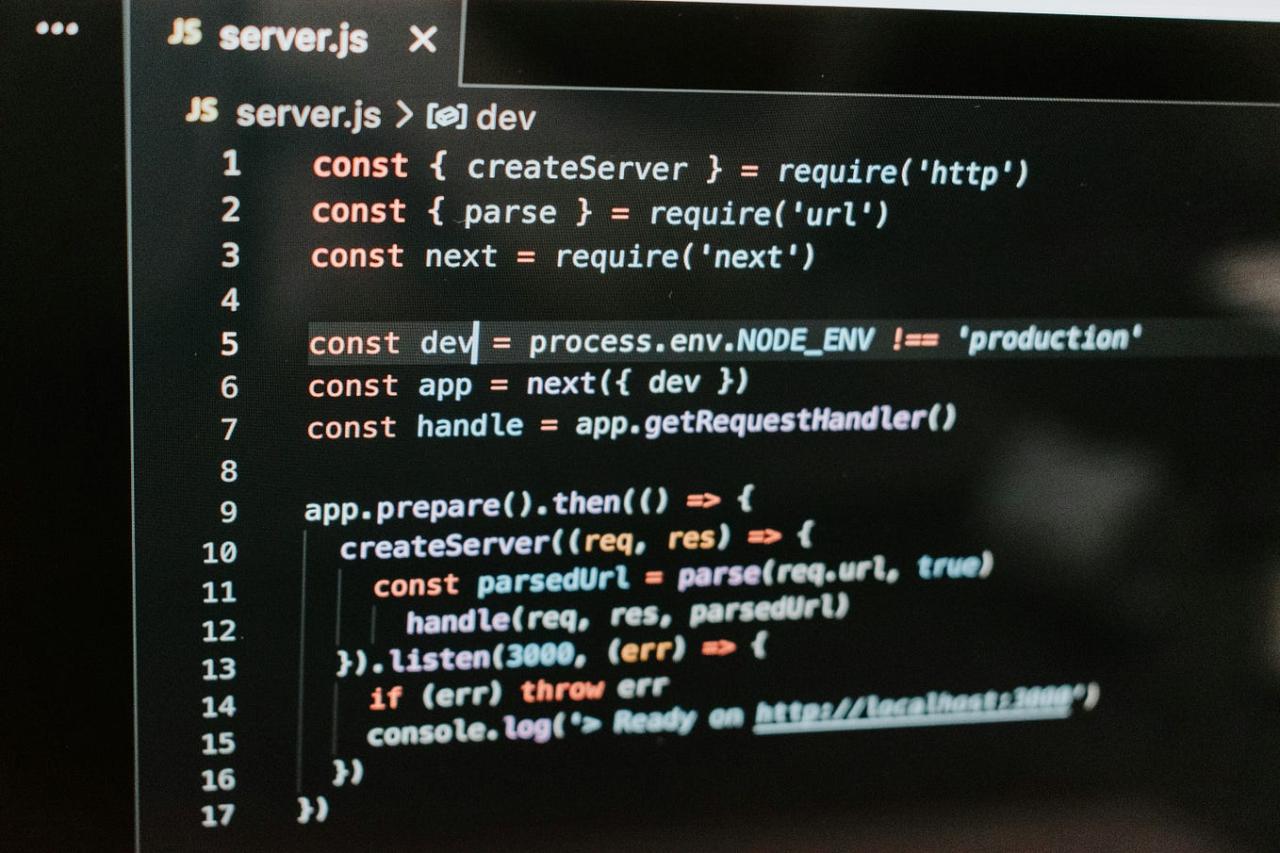
Coding the Chatbot Logic
Now that the foundation is set with platform selection and account setup, the core of the chatbot – its logic – comes into play. This involves crafting the rules and responses that govern how the chatbot interacts with users. The following sections will explore the various methods for handling user input, processing it, and generating appropriate responses. We will also provide code examples and a flowchart to illustrate these concepts.
Methods for Handling User Input
User input is the fuel that drives a chatbot’s conversation. Efficiently handling this input is critical for providing a positive user experience. Several methods are employed to achieve this:
- Matching: This is a fundamental technique where the chatbot identifies specific s within the user’s message. If a is present, the chatbot triggers a pre-defined response. This method is straightforward to implement but can be limited in its ability to understand complex or nuanced language. For example, if a user types “book a flight,” the chatbot might respond with a prompt for destination and date.
- Intent Recognition: More sophisticated than matching, intent recognition aims to understand the user’s goal or intention behind their message. This involves using Natural Language Processing (NLP) techniques to analyze the user’s input and classify it into a predefined set of intents. For instance, a user might type “I need to book a flight to Paris,” and the chatbot, using intent recognition, would identify the intent as “book_flight.”
- Entity Extraction: Closely related to intent recognition, entity extraction involves identifying specific pieces of information (entities) within the user’s input. These entities provide the details needed to fulfill the user’s request. For example, in the phrase “book a flight to Paris on July 15th,” the entities would be “Paris” (destination) and “July 15th” (date).
- Context Management: Chatbots often need to maintain context throughout a conversation. This means remembering previous interactions and using that information to understand and respond to subsequent messages. Context management allows the chatbot to provide more personalized and relevant responses. For example, if a user previously asked about flights to Paris, the chatbot can use that context when the user asks about prices.
Code Examples for Basic Chatbot Functionalities
The following examples demonstrate basic chatbot functionalities using both Python and JavaScript. These examples illustrate how to implement greeting users, responding to simple questions, and handling errors.
Python Example
This Python code snippet demonstrates a simple chatbot using matching.“`pythondef chatbot(): print(“Hello! I am a simple chatbot.”) while True: user_input = input(“You: “) user_input = user_input.lower() # convert to lowercase for easier comparison if “hello” in user_input or “hi” in user_input: print(“Chatbot: Hello there!”) elif “how are you” in user_input: print(“Chatbot: I am doing well, thank you!”) elif “goodbye” in user_input or “bye” in user_input: print(“Chatbot: Goodbye! Have a great day.”) break # Exit the loop else: print(“Chatbot: I’m sorry, I don’t understand.
Please try again.”)chatbot()“`The code defines a `chatbot()` function that handles user input. It converts the input to lowercase to facilitate matching. It then uses `if/elif/else` statements to check for specific s and provide appropriate responses. The `break` statement exits the conversation loop.
JavaScript Example
This JavaScript example demonstrates similar functionality, designed to run in a web environment or a Node.js environment.“`javascriptfunction chatbot() const readline = require(‘readline’).createInterface( input: process.stdin, output: process.stdout ); console.log(“Hello! I am a simple chatbot.”); function askQuestion() readline.question(“You: “, (user_input) => user_input = user_input.toLowerCase(); if (user_input.includes(“hello”) || user_input.includes(“hi”)) console.log(“Chatbot: Hello there!”); else if (user_input.includes(“how are you”)) console.log(“Chatbot: I am doing well, thank you!”); else if (user_input.includes(“goodbye”) || user_input.includes(“bye”)) console.log(“Chatbot: Goodbye! Have a great day.”); readline.close(); return; // Exit the function else console.log(“Chatbot: I’m sorry, I don’t understand.
Please try again.”); askQuestion(); // Continue asking questions ); askQuestion();chatbot();“`This JavaScript code uses the `readline` module (for Node.js) to handle user input from the console.
The code defines a function `chatbot()` that begins by greeting the user. The `askQuestion()` function prompts the user for input, processes it, and provides a response. It uses `if/else` statements for matching and recursively calls `askQuestion()` to continue the conversation until the user says goodbye.
Flowchart for a Simple Chatbot Scenario
A flowchart helps visualize the flow of conversation in a chatbot. This flowchart illustrates a simple scenario where the chatbot greets the user, asks for their name, and then responds.
Flowchart Description:The flowchart begins with a start symbol (oval) labeled “Start.”
1. Greeting
The flowchart then moves to a process box (rectangle) labeled “Chatbot greets user: ‘Hello! Welcome.'”
2. User Input
A parallelogram (input/output) represents the user input: “User types their name.”
3. Chatbot Response
Another process box shows the chatbot responding: “Chatbot responds: ‘Hello [User’s Name]!'”
4. Decision
A diamond (decision) symbol is used to show a decision point, with the question: “Does the user want to continue?”
5. Branching Paths
Two paths branch out from the decision point:
Yes Path
If the user wants to continue, the flowchart loops back to the user input step.
No Path
If the user does not want to continue, the flowchart leads to an end symbol (oval) labeled “End.” This simple flowchart demonstrates the basic structure of a chatbot interaction. More complex flowcharts would include additional decision points and branches to handle more sophisticated conversations.
Connecting the Chatbot to Messenger

Now that the chatbot logic is coded and a Messenger app is set up, the next crucial step is connecting the two. This involves linking your chatbot’s backend (where the code resides) to your Messenger app on Facebook, allowing it to receive and respond to user messages. This section details the process, including configuring webhooks for message handling and troubleshooting common connection problems.
Connecting Your Chatbot to Your Messenger App
The process of connecting your chatbot to your Messenger app involves several steps within the Facebook Developer platform. It requires proper configuration of your app’s settings to ensure it can receive and send messages.
- Access Your Facebook Developer App Dashboard: Log in to your Facebook Developer account and navigate to your app’s dashboard. Select the app you created earlier.
- Navigate to Messenger Settings: Within the app dashboard, find the “Messenger” section. This is where you’ll configure settings related to your chatbot’s integration with Messenger.
- Select a Facebook Page: If you haven’t already, link your app to a Facebook Page. Your chatbot will operate through this page. In the Messenger settings, you’ll see an option to “Add or Remove Pages.” Select the Facebook Page you want your chatbot to be associated with. This allows the chatbot to interact with users through that specific page.
- Generate a Page Access Token: This token is a critical security credential that allows your chatbot to interact with the Facebook Page. In the Messenger settings, you’ll find a section for “Access Tokens.” Click “Generate Token” and select the Facebook Page to generate a Page Access Token. Save this token securely; it will be used in your chatbot’s code to authenticate requests. The token grants your bot the permissions to send and receive messages on behalf of the Page.
- Configure Webhooks: Webhooks are essential for real-time communication. They notify your chatbot’s backend whenever a user sends a message or interacts with the bot.
Configuring Webhooks
Webhooks are the mechanism by which Facebook’s servers notify your chatbot’s backend of events, such as incoming messages. Proper configuration is crucial for real-time message handling.
The following steps detail how to configure webhooks:
- Enter Your Webhook URL: In the Messenger settings of your app, you’ll find a section for “Webhooks.” You’ll need to provide a URL where Facebook will send notifications. This URL points to the endpoint in your chatbot’s backend that will handle incoming messages.
- Verify Your Webhook: When you set up a webhook, Facebook will send a “challenge” request to your specified URL. Your backend code needs to respond to this challenge to verify the webhook. This is a security measure to confirm that your server can receive and process these requests.
- Choose Subscription Fields: You’ll need to select the events your webhook should subscribe to. This includes things like “messages” (for incoming user messages), “messaging_postbacks” (for button clicks and menu selections), and “message_deliveries” (for delivery confirmations). Selecting the correct fields ensures your bot receives the necessary data to function correctly.
- Implement the Webhook Handler in Your Code: Your backend code must be designed to receive and process webhook requests. This typically involves parsing the data sent by Facebook, identifying the user’s message, and then triggering the appropriate chatbot logic to generate a response.
- Test Your Webhook: After configuring the webhook, it is vital to test the setup. You can send a test message to your Facebook Page and check your server logs to ensure the webhook is triggered and that your bot receives the message. This ensures the connection between Facebook and your chatbot’s backend is working as expected.
Troubleshooting Common Connection Issues
Even with careful configuration, connection issues can arise. Understanding common problems and their solutions is critical for a functional chatbot.
Common issues and their solutions include:
- Webhook Verification Errors: If the webhook verification fails, double-check that your backend code correctly responds to the challenge request with the correct value. Incorrectly formatted responses or server-side errors during the verification process will cause the setup to fail.
- Incorrect Page Access Token: An invalid or expired Page Access Token will prevent your chatbot from sending or receiving messages. Verify the token’s validity in the Facebook Developer dashboard and regenerate it if necessary. The token should also have the correct permissions.
- Server Downtime or Errors: If your server is down or experiencing errors, Facebook won’t be able to send webhook requests. Monitor your server’s status and logs for any issues that might be disrupting communication. Implement proper error handling in your chatbot’s code to manage unexpected server responses.
- Incorrect Subscription Fields: If you don’t subscribe to the correct fields in the webhook settings, your chatbot might not receive all the necessary events. Ensure you’ve subscribed to the relevant fields like “messages” and “messaging_postbacks.” Review the documentation to ensure you’re using the correct field names.
- Firewall or Network Issues: Your server’s firewall or network configuration might block incoming webhook requests from Facebook. Ensure your firewall rules allow traffic from Facebook’s IP addresses.
- Code Errors in the Webhook Handler: Errors in your backend code that processes webhook requests can prevent your chatbot from functioning correctly. Carefully review your code for syntax errors and logical flaws.
- Rate Limiting: Facebook imposes rate limits on sending messages. If your chatbot sends messages too quickly, it might be temporarily blocked. Implement rate-limiting mechanisms in your chatbot code to avoid exceeding these limits.
- Debugging Tools: Utilize tools like Facebook’s webhook debugger and your server logs to identify and diagnose connection problems. Facebook’s webhook debugger allows you to simulate events and examine the data sent to your webhook URL.
Building Interactive Chatbot Features
Enhancing your Messenger chatbot with interactive features is crucial for user engagement and providing a richer, more informative experience. This section will guide you through implementing rich media, designing interactive elements like buttons and carousels, and integrating external APIs to deliver dynamic content. By incorporating these features, you can transform a basic chatbot into a powerful tool for communication, information delivery, and user interaction.
Implementing Rich Media in Your Chatbot
Integrating rich media, such as images, videos, and audio, elevates the chatbot experience by making it more engaging and visually appealing. This section Artikels how to incorporate these media types effectively.
- Images: Images are excellent for visual communication. They can be used to showcase products, provide visual instructions, or simply add visual interest to the conversation. To send an image, you’ll typically use the Messenger API’s image attachment feature. You’ll need a publicly accessible URL for the image.
- Videos: Videos are ideal for demonstrating products, providing tutorials, or sharing engaging content. Similar to images, you’ll use the Messenger API’s video attachment feature, specifying a publicly accessible video URL.
- Audio: Audio can be used for delivering podcasts, playing voice messages, or providing sound effects. Use the Messenger API’s audio attachment feature, providing a publicly accessible audio file URL.
Designing Interactive User Experiences with Buttons, Quick Replies, and Carousels
Interactive elements like buttons, quick replies, and carousels are vital for guiding users through conversations and providing structured choices. They improve the user experience by making interactions more intuitive and efficient.
- Buttons: Buttons allow users to trigger specific actions or navigate to different parts of the chatbot. They are excellent for providing clear choices and are particularly useful when you need to present a limited set of options. For example, you could use buttons for “Shop Now,” “Contact Support,” or “Learn More.” Buttons can be linked to URLs, trigger other messages, or perform other functions within the chatbot.
- Quick Replies: Quick replies offer a streamlined way for users to respond to a question or prompt with a single tap. Unlike buttons, quick replies appear directly below the message input field, making them more accessible. They are best suited for multiple-choice questions or providing common responses. They disappear after the user selects an option.
- Carousels: Carousels are ideal for presenting multiple items, such as product listings or news articles, in a visually appealing format. Each item in the carousel can include an image, title, subtitle, and buttons for further actions. Carousels are particularly effective for showcasing a range of products or information in a single message.
Integrating External APIs for Dynamic Content
Integrating external APIs allows your chatbot to fetch real-time data and provide dynamic content, enhancing its functionality and usefulness. This is crucial for providing up-to-date information, such as weather forecasts, news updates, or product availability.
To integrate an API, you’ll typically:
- Choose an API: Select the API that provides the data you need (e.g., weather, news, e-commerce). Ensure the API has a public endpoint and provides the data in a usable format (e.g., JSON).
- Obtain API Keys: Many APIs require an API key for authentication. Obtain your API key and store it securely.
- Make API Calls: Use your chatbot’s programming language (e.g., Node.js, Python) to make HTTP requests to the API endpoint. Include your API key in the request headers or parameters.
- Parse the Response: Parse the API’s response (typically JSON) to extract the relevant data.
- Display the Data: Format the data and display it in your chatbot using text, images, or other rich media elements.
Example: Weather API Integration
Imagine you want to create a chatbot that provides weather information. You can use a weather API (e.g., OpenWeatherMap). Here’s a simplified overview:
- API Call: Your chatbot makes an API call to OpenWeatherMap, providing the city name (e.g., “London”) and your API key.
- Response: The API returns a JSON response containing weather data (temperature, conditions, etc.).
- Data Extraction: Your chatbot parses the JSON to extract the temperature and weather description.
- Display: The chatbot displays the weather information to the user, for example, “The weather in London is 20°C and sunny.”
User Authentication and Data Storage
Integrating user authentication and data storage into your Messenger chatbot is crucial for creating personalized experiences, managing user interactions, and ensuring compliance with privacy regulations. This allows you to identify users, remember their preferences, and tailor the chatbot’s responses accordingly. Properly handling user data enhances user engagement and builds trust.
Methods for Authenticating Users
Authenticating users within a Messenger chatbot involves verifying their identity to ensure they are who they claim to be. Several methods can be employed to achieve this, each with its own advantages and considerations regarding security and user experience.
- Facebook Login: Leveraging Facebook’s built-in login system is a straightforward approach. This allows users to authenticate using their existing Facebook credentials.
- This method provides a seamless experience, as users don’t need to create new accounts.
- It simplifies the authentication process by utilizing Facebook’s authentication infrastructure.
- Access to user data is governed by Facebook’s permissions, ensuring users control what information is shared.
- Custom Authentication: Implementing a custom authentication system offers greater control over the user experience and data management.
- This method requires users to create an account within your chatbot’s ecosystem.
- You’ll need to design and manage your own user registration, login, and password recovery processes.
- This approach allows you to collect specific user data relevant to your chatbot’s functionality.
- One-Time Passcodes (OTPs): OTPs provide a secure way to verify a user’s identity, often used in conjunction with other authentication methods.
- OTPs are sent to the user’s email address or phone number.
- Users enter the OTP within the chatbot to confirm their identity.
- This method adds an extra layer of security, especially useful for sensitive operations.
- Token-Based Authentication: After successful authentication, a token is issued to the user. This token is then used for subsequent requests to identify the user.
- Tokens can be implemented using JWT (JSON Web Tokens) for secure transmission and verification.
- This approach is suitable for stateless authentication, simplifying scalability.
- Tokens can be set to expire, reducing the risk of compromise.
Options for Storing User Data and Conversation History
Choosing the right data storage solution is critical for efficiently managing user data and conversation history. The selection depends on factors such as data volume, access frequency, and security requirements.
- Database Management Systems (DBMS): Databases provide structured storage for user data and conversation history.
- Relational Databases (SQL): These databases, like MySQL, PostgreSQL, and Microsoft SQL Server, are well-suited for structured data. They offer robust data integrity and are suitable for complex queries.
- NoSQL Databases: These databases, such as MongoDB and Cassandra, are designed for flexible data models and high scalability. They are ideal for handling large volumes of unstructured or semi-structured data.
- Cloud Storage Services: Cloud services like Amazon S3, Google Cloud Storage, and Azure Blob Storage offer scalable and cost-effective solutions for storing large volumes of data.
- These services are well-suited for storing media files (images, videos, audio) and large conversation logs.
- They provide features like data replication and access control for enhanced security.
- Chatbot Platform Storage: Some chatbot platforms offer built-in storage solutions for user data and conversation history.
- This can simplify data management and integration, particularly for smaller projects.
- However, it’s important to consider the platform’s limitations and data security practices.
Best Practices for Handling User Data Securely and in Compliance with Privacy Regulations
Handling user data responsibly is essential for building trust and complying with privacy regulations like GDPR and CCPA. Implementing best practices ensures the security and privacy of user information.
- Data Encryption: Encrypting sensitive data, both in transit and at rest, protects it from unauthorized access.
- Use HTTPS for secure communication between the chatbot and the server.
- Encrypt data stored in databases and cloud storage.
- Access Control: Implementing strict access controls limits who can access user data.
- Follow the principle of least privilege, granting users only the necessary access.
- Regularly review and update access permissions.
- Data Minimization: Collect only the data necessary for the chatbot’s functionality.
- Avoid collecting unnecessary personal information.
- Regularly review and delete data that is no longer needed.
- Data Retention Policies: Establish clear data retention policies that specify how long data will be stored and when it will be deleted.
- Adhere to legal requirements and user preferences.
- Regularly review and update data retention policies.
- User Consent and Transparency: Obtain explicit consent from users before collecting their data.
- Provide clear and concise privacy policies that explain how data is collected, used, and protected.
- Allow users to access, modify, and delete their data.
- Regular Security Audits: Conduct regular security audits to identify and address potential vulnerabilities.
- Test the chatbot’s security measures and data storage practices.
- Stay informed about the latest security threats and best practices.
- Compliance with Privacy Regulations: Ensure the chatbot complies with relevant privacy regulations, such as GDPR, CCPA, and others.
- Appoint a Data Protection Officer (DPO) if required.
- Implement measures to protect user data rights.
Testing and Debugging the Chatbot

Thoroughly testing and debugging your chatbot is crucial for ensuring it functions correctly, provides a positive user experience, and meets the intended objectives. A well-tested chatbot is more reliable, less prone to errors, and can handle a wider range of user inputs and scenarios. Neglecting this step can lead to frustration for users, damage your brand reputation, and hinder the chatbot’s effectiveness.
Importance of Comprehensive Testing
Comprehensive testing identifies potential issues early in the development process, allowing for timely fixes and preventing problems from reaching production. Testing also validates that the chatbot’s responses are accurate, relevant, and aligned with the defined goals. A robust testing strategy minimizes the risk of unexpected behavior, errors, and negative user experiences. It also provides valuable insights into the chatbot’s performance and areas for improvement.
Testing Methods for Chatbot Evaluation
Employing a variety of testing methods ensures comprehensive coverage and identifies different types of issues. These methods, when used in conjunction, provide a holistic view of the chatbot’s performance.
- Unit Testing: This involves testing individual components or modules of the chatbot in isolation. Each unit, such as a specific function or intent, is tested to ensure it behaves as expected. Unit tests are typically automated and run frequently during development.
- Integration Testing: Integration testing focuses on verifying that different components of the chatbot work together correctly. It checks the interactions between modules and ensures data flows seamlessly between them.
- System Testing: System testing evaluates the entire chatbot system as a whole. It assesses the chatbot’s functionality, performance, and security in a simulated production environment.
- User Acceptance Testing (UAT): UAT involves testing the chatbot with real users or representative stakeholders. Users interact with the chatbot to provide feedback on its usability, accuracy, and overall effectiveness. This helps identify any issues from a user’s perspective.
- Regression Testing: After making changes or fixes to the chatbot, regression testing is performed to ensure that existing functionality remains unaffected. This helps prevent new issues from being introduced during development.
- Performance Testing: Performance testing evaluates the chatbot’s responsiveness and scalability under different load conditions. It helps identify bottlenecks and ensures the chatbot can handle a large number of concurrent users.
- Security Testing: Security testing assesses the chatbot’s vulnerability to security threats, such as unauthorized access or data breaches. This includes testing for input validation, authentication, and authorization vulnerabilities.
Debugging Common Chatbot Issues
Debugging involves identifying and resolving errors or issues in the chatbot’s code and logic. Common issues can include incorrect responses, unexpected behavior, or integration problems.
- Analyzing Error Logs: Examine error logs to identify the source of issues. These logs often contain valuable information, such as error messages, stack traces, and timestamps, which can help pinpoint the problem.
- Using Debugging Tools: Utilize debugging tools provided by the chatbot platform or programming language to step through the code, inspect variables, and identify the root cause of errors.
- Testing with Different Inputs: Experiment with various user inputs, including edge cases and unexpected queries, to uncover potential vulnerabilities or limitations in the chatbot’s logic.
- Reviewing Code and Logic: Carefully review the chatbot’s code and logic to identify any errors, inconsistencies, or inefficiencies. Pay attention to conditional statements, variable assignments, and API calls.
- Simplifying Complex Logic: Break down complex chatbot logic into smaller, more manageable components. This can make it easier to understand, debug, and maintain the chatbot.
- Checking API Integrations: Verify that all API integrations are working correctly. Ensure that the chatbot is receiving the expected data and sending the correct requests. Test the API connections separately to ensure they are functioning as intended.
Improving Chatbot Performance
Optimizing the chatbot’s performance enhances its responsiveness, accuracy, and overall user experience.
- Optimizing Response Times: Improve the chatbot’s response times by optimizing the code, reducing the number of API calls, and caching frequently accessed data.
- Improving Accuracy: Train the chatbot with a comprehensive dataset of user inputs and responses to improve its accuracy. Refine the chatbot’s natural language understanding (NLU) model to better understand user intent.
- Enhancing User Experience: Design clear and concise responses that are easy for users to understand. Provide helpful prompts and suggestions to guide users through the conversation. Consider incorporating visual elements, such as images and videos, to enhance the user experience.
- Regular Monitoring and Maintenance: Continuously monitor the chatbot’s performance and make adjustments as needed. Regularly update the chatbot’s knowledge base and retrain the NLU model to improve its accuracy and relevance.
Deploying and Maintaining Your Chatbot
Deploying and maintaining a chatbot on Messenger is crucial for its long-term success. This involves making your chatbot accessible to users, ensuring it functions correctly, and continuously improving its performance. Careful planning and execution of the deployment and maintenance phases will maximize user satisfaction and achieve your chatbot’s objectives.
Deploying Your Chatbot to Messenger
To deploy your chatbot to Messenger, several steps must be followed. These steps ensure that your chatbot is accessible to users and functions as intended within the Messenger platform.
- Preparing Your Code: Before deployment, ensure your chatbot code is thoroughly tested and free of errors. This includes testing all chatbot logic, features, and integrations. Use testing frameworks and tools to simulate user interactions and identify potential issues.
- Connecting to a Hosting Platform: Your chatbot code needs to be hosted on a platform that can handle incoming requests from Messenger. Popular options include cloud services like Amazon Web Services (AWS), Google Cloud Platform (GCP), Microsoft Azure, or dedicated hosting providers. These platforms provide the infrastructure and resources needed to run your chatbot.
- Configuring Webhooks: Webhooks are essential for Messenger to communicate with your chatbot. In the Messenger app settings, you’ll need to configure the webhook URL to point to your hosted chatbot code. This URL receives incoming messages and events from Messenger.
- Subscribing to Events: Within the Messenger app settings, subscribe your webhook to the relevant events, such as message received, message delivered, and postback received. These subscriptions tell Messenger which events to send to your webhook.
- Testing the Deployment: After deployment, thoroughly test your chatbot by sending messages and interacting with its features. Verify that the chatbot responds correctly and that all features are working as expected. Use the Messenger platform’s testing tools and real user accounts to validate the chatbot’s functionality.
Monitoring Chatbot Performance and User Engagement
Monitoring your chatbot’s performance and user engagement is vital for understanding how users interact with it and identifying areas for improvement. Key metrics and strategies provide insights into the chatbot’s effectiveness.
- Key Performance Indicators (KPIs): Track relevant KPIs to measure chatbot performance. These may include:
- Conversation Count: The total number of conversations initiated with the chatbot.
- User Retention Rate: The percentage of users who return to use the chatbot.
- Average Conversation Length: The average number of turns or messages exchanged per conversation.
- Task Completion Rate: The percentage of users who successfully complete a specific task (e.g., making a purchase, finding information).
- Error Rate: The percentage of interactions that result in errors or unexpected behavior.
- User Satisfaction: Measured through surveys, feedback forms, or sentiment analysis.
- User Engagement Metrics: Analyze user engagement to understand how users interact with the chatbot. This includes:
- Message Volume: The total number of messages sent and received.
- Feature Usage: The frequency with which users use different chatbot features.
- Session Duration: The average time users spend interacting with the chatbot.
- Click-Through Rates: For buttons, quick replies, and other interactive elements.
- Monitoring Tools: Use analytics dashboards and monitoring tools to track KPIs and engagement metrics. Popular options include:
- Facebook Insights: Provides basic analytics for your Messenger app.
- Chatbot Platform Analytics: Many chatbot platforms offer built-in analytics dashboards.
- Third-Party Analytics Tools: Integrate with tools like Google Analytics or specialized chatbot analytics platforms for advanced reporting.
- Regular Reporting: Generate regular reports summarizing key metrics and insights. Analyze trends, identify areas of improvement, and make data-driven decisions to optimize chatbot performance.
Updating and Maintaining Your Chatbot
Maintaining a chatbot requires a proactive approach to ensure it remains relevant, effective, and secure. Regular updates and maintenance address issues, incorporate new features, and enhance the user experience.
- Regular Code Updates: Regularly update the chatbot’s code to address bugs, improve performance, and incorporate new features. Use version control systems like Git to manage code changes and track revisions.
- Content Updates: Keep the chatbot’s content and knowledge base up-to-date. This includes updating FAQs, product information, and other relevant content. Regularly review and refresh content to ensure accuracy and relevance.
- Feature Enhancements: Continuously enhance the chatbot’s features based on user feedback and performance data. This may involve adding new functionalities, improving existing features, or integrating with other services.
- Security Updates: Implement security best practices to protect user data and prevent unauthorized access. Regularly update dependencies, address security vulnerabilities, and monitor for suspicious activity.
- User Feedback: Collect user feedback through surveys, feedback forms, and user testing. Use this feedback to identify areas for improvement and prioritize updates.
- Performance Optimization: Optimize the chatbot’s performance to ensure it responds quickly and efficiently. This may involve optimizing code, database queries, and infrastructure.
- Testing and Iteration: Continuously test the chatbot after each update or change. Conduct user testing and iterate on the chatbot’s design and functionality based on feedback and performance data.
Advanced Techniques and Integrations
Integrating your Messenger chatbot with other services and implementing advanced features can significantly enhance its functionality and user experience. This allows you to create a more powerful and versatile chatbot that can handle complex tasks and provide richer interactions. This section delves into these advanced techniques.
Integrating with External Services
Integrating your chatbot with external services is essential for extending its capabilities beyond basic conversational interactions. This integration allows the chatbot to access and utilize data from other platforms, such as e-commerce platforms, customer support systems, and CRM tools.To integrate with e-commerce platforms, you can connect your chatbot to services like Shopify, WooCommerce, or custom e-commerce solutions. This enables users to browse products, add items to their cart, and even complete purchases directly within the Messenger interface.For customer support, integrating with systems like Zendesk, Intercom, or Salesforce Service Cloud allows the chatbot to handle common inquiries, route users to human agents when necessary, and access customer support data.Here are some key considerations when integrating with external services:
- API Integration: Use APIs (Application Programming Interfaces) provided by the external services to fetch data, send requests, and exchange information.
- Authentication: Implement secure authentication methods to protect sensitive data and ensure authorized access to external services.
- Data Mapping: Map data fields between your chatbot and the external service to ensure compatibility and data integrity.
- Error Handling: Implement robust error handling to gracefully manage issues that may arise during the integration process, such as network failures or service outages.
Implementing Natural Language Understanding (NLU) and Machine Learning (ML)
Natural Language Understanding (NLU) and Machine Learning (ML) are powerful technologies that can significantly improve the intelligence and responsiveness of your chatbot. NLU allows your chatbot to understand the meaning of user input, while ML enables it to learn from interactions and improve its performance over time.NLU involves several components:
- Intent Recognition: Identifying the user’s intent or goal, such as “place an order” or “check order status.”
- Entity Extraction: Extracting relevant information from the user’s input, such as product names, quantities, or shipping addresses.
- Sentiment Analysis: Determining the user’s emotional tone, such as positive, negative, or neutral.
ML can be used to train chatbots to:
- Improve intent recognition accuracy: By training on large datasets of user interactions.
- Personalize responses: By learning user preferences and past behavior.
- Automate complex tasks: By learning how to handle different types of requests.
Popular platforms for implementing NLU and ML include Dialogflow (formerly API.ai), Rasa, and Microsoft Bot Framework. These platforms provide pre-built NLU models, training tools, and integration options.
Integrating a Payment Gateway
Integrating a payment gateway into your chatbot allows users to make purchases directly within the Messenger interface. This can significantly improve the user experience and streamline the sales process. The process typically involves the following steps:
1. Choose a Payment Gateway: Select a payment gateway provider that supports Messenger integration, such as Stripe, PayPal, or Braintree. Consider factors like transaction fees, supported currencies, and security features.
2. Obtain API Credentials: Sign up for an account with the payment gateway provider and obtain the necessary API credentials, such as API keys and secret keys.
3. Integrate the Payment Gateway API: Use the payment gateway’s API to integrate payment functionality into your chatbot. This typically involves creating payment requests, handling payment confirmations, and processing refunds.
4. Implement Security Measures: Implement robust security measures to protect sensitive payment information. This includes using HTTPS, encrypting data, and adhering to PCI DSS compliance standards.
5. Test the Integration: Thoroughly test the integration to ensure that payments are processed correctly and that the user experience is seamless.
Final Summary

In conclusion, mastering how to code chatbot integration with Messenger opens up a world of opportunities for businesses and individuals alike. By following the guidelines and techniques Artikeld in this guide, you can create powerful and engaging chatbots that enhance user experiences, streamline communication, and drive results. The journey from concept to deployment is challenging, but the rewards of a well-crafted chatbot are well worth the effort.