Embarking on the journey of “how to code a mobile app for booking” unveils a world of possibilities, from simplifying appointment scheduling to revolutionizing resource management. Booking apps have become indispensable tools for both businesses and users, offering unparalleled convenience and efficiency. This guide will serve as your compass, navigating the intricate landscape of mobile app development and providing a clear roadmap to building your own successful booking application.
We will delve into the core functionalities that define a booking app, exploring diverse applications such as hotel reservations, restaurant bookings, and appointment scheduling. This exploration will consider the needs and expectations of the target audience, setting the stage for a detailed examination of the technological choices involved in crafting a robust and user-friendly booking app. We will cover front-end and back-end technologies, database design, development environment setup, user authentication, booking functionality, notifications, testing, and deployment.
Introduction: Defining the Scope of “How to Code a Mobile App for Booking”
This guide will delve into the intricacies of developing mobile applications designed for booking services and resources. We’ll explore the essential features, diverse application types, and the expectations of the target audience, providing a comprehensive understanding of the development process.
Core Functionalities of Booking Apps
Booking applications, at their core, facilitate the scheduling of appointments, reservation of resources, and management of associated transactions. These apps aim to streamline the booking process for both the service provider and the user, offering convenience and efficiency.
- Appointment Scheduling: This is a fundamental feature, enabling users to book time slots for services. This includes:
- Calendar Integration: Allowing users to view available time slots and integrate bookings with their personal calendars (e.g., Google Calendar, Outlook).
- Reminders and Notifications: Sending automated reminders to users and service providers to reduce no-shows and ensure timely service delivery.
- Resource Reservation: This feature focuses on booking specific resources, such as hotel rooms, rental cars, or event venues. Key aspects include:
- Availability Management: Real-time updates on resource availability, preventing overbooking.
- Filtering and Sorting: Allowing users to filter and sort resources based on criteria like price, location, and features.
- Payment Processing: Securely handling financial transactions within the app. This involves:
- Integration with Payment Gateways: Supporting various payment methods (e.g., credit cards, PayPal, Apple Pay).
- Transaction History: Providing users with a detailed history of their bookings and payments.
- User Accounts and Profiles: Managing user data and preferences. This includes:
- Personalized Experience: Remembering user preferences and booking history to provide a more tailored experience.
- Security Measures: Implementing secure login and data storage to protect user information.
- Search and Discovery: Enabling users to find the services or resources they need. This involves:
- Location-Based Services: Integrating with mapping services to display nearby services or resources.
- Advanced Search Filters: Allowing users to refine their search based on various criteria (e.g., price range, service type, availability).
Examples of Different Types of Booking Apps
Booking apps are versatile and cater to a wide array of industries. The specific features and functionalities may vary depending on the target service or resource.
- Hotel Booking Apps: These apps allow users to search for hotels, view room availability, compare prices, and make reservations. They often include features like:
- Interactive Maps: Displaying hotel locations and surrounding areas.
- User Reviews and Ratings: Providing insights into the guest experience.
- Restaurant Booking Apps: Facilitating table reservations at restaurants. Key features include:
- Real-time Table Availability: Displaying available tables and time slots.
- Menu Browsing: Allowing users to view the restaurant’s menu.
- Appointment Scheduling Apps: Used by professionals such as doctors, dentists, and salons to manage appointments. They include:
- Service Selection: Allowing users to choose the desired service.
- Staff Availability: Displaying the availability of different staff members.
- Transportation Booking Apps: Enabling users to book rides, flights, or rental vehicles. These apps often feature:
- Real-time Tracking: Tracking the location of the booked vehicle or flight.
- Price Comparison: Comparing prices from different providers.
Target Audience and Their Expectations
Understanding the target audience is crucial for designing a successful booking app. Users have specific expectations regarding usability, convenience, and security.
- Ease of Use: Users expect a simple and intuitive interface. The app should be easy to navigate, with clear instructions and a streamlined booking process.
- Convenience: Booking apps should save users time and effort. This includes:
- 24/7 Availability: Allowing users to book services or resources at any time.
- Mobile Accessibility: Providing access to bookings on the go.
- Reliability: The app should function smoothly and reliably. Users expect the app to accurately reflect availability, process payments securely, and provide timely notifications.
- Security: Protecting user data is paramount. Users expect secure login procedures, encrypted payment processing, and data privacy.
- Personalization: Users appreciate a personalized experience. This can include:
- Customized Recommendations: Suggesting services or resources based on user preferences and booking history.
- Loyalty Programs: Offering rewards and incentives to frequent users.
Choosing the Right Technologies
Selecting the appropriate technologies for your mobile booking app is crucial for its success. This decision impacts development time, cost, performance, and future scalability. The frontend, responsible for the user interface and experience, requires careful consideration of programming languages and frameworks.Understanding the strengths and weaknesses of each technology will allow you to make informed decisions that align with your project’s goals and resources.
This section explores the key aspects of frontend development, providing insights into popular languages, the native versus cross-platform debate, and UI/UX design considerations.
Popular Programming Languages for Mobile App Frontend Development
Several programming languages are commonly used for mobile app frontend development. The choice depends on the platform (iOS or Android) and whether you opt for native or cross-platform development.
- Swift: Primarily used for iOS app development, Swift is known for its safety, speed, and modern syntax. Apple actively supports Swift, making it a reliable choice for building high-performance iOS applications.
- Kotlin: Officially supported by Google for Android development, Kotlin is a modern language that improves on Java’s shortcomings. It offers concise syntax, null safety, and interoperability with Java, making it a popular choice for Android developers.
- JavaScript (with React Native): React Native allows developers to build cross-platform apps using JavaScript and React. It leverages native UI components, providing a native-like user experience. It’s a good option if you want to share code between iOS and Android.
- Dart (with Flutter): Flutter, developed by Google, uses Dart as its programming language. Flutter enables the creation of natively compiled applications for both iOS and Android from a single codebase. It’s known for its fast performance and expressive UI.
Native vs. Cross-Platform Development Frameworks
The decision between native and cross-platform development is a critical one. Native development involves building separate apps for each platform (iOS and Android) using their respective languages and SDKs. Cross-platform development allows you to write code once and deploy it on both platforms.The following table compares the advantages and disadvantages of native and cross-platform development frameworks:
| Feature | Native Development | Cross-Platform Development |
|---|---|---|
| Performance | Generally offers the best performance due to direct access to device hardware and optimized platform-specific code. | Performance can sometimes be slightly less than native, although improvements are constantly being made. Performance depends on the framework and optimization efforts. |
| User Experience | Provides the most native-like user experience, with full access to platform-specific UI elements and features. Allows for the best integration with platform-specific features. | User experience can be very good, often approaching native quality. Frameworks strive to provide native-like UI components. Requires careful UI/UX design to match platform conventions. |
| Development Time & Cost | Requires separate codebases for each platform, which can lead to longer development times and higher costs. | Can reduce development time and cost by allowing code reuse across platforms. However, learning a new framework introduces a learning curve. |
| Code Reusability | Limited code reuse between platforms. Requires writing code specific to each platform’s language and SDK. | High code reusability. Allows sharing a significant portion of the codebase between iOS and Android. Reduces code duplication. |
Design the User Interface (UI) and User Experience (UX) Considerations for a Booking App
Designing a user-friendly and intuitive UI/UX is paramount for a successful booking app. Users should be able to easily search, browse, select, and book services or accommodations.
- Intuitive Navigation: The app should have a clear and consistent navigation structure. Use a bottom navigation bar, tab bar, or hamburger menu for easy access to key features like search, bookings, profile, and help.
- Simplified Search and Filtering: Provide a robust search function with filters for date, location, price, and other relevant criteria. Offer autocomplete suggestions to enhance the user experience. The search bar should be prominently displayed.
- Clear Visual Hierarchy: Use a clear visual hierarchy to guide users through the booking process. Use headings, subheadings, and white space to organize information and make it easy to scan.
- High-Quality Visuals: Display high-quality images and videos of the services or accommodations. This is especially important for booking apps, as visuals play a key role in influencing user decisions.
- Mobile-First Design: Design the app with a mobile-first approach. Ensure the interface is optimized for smaller screens and touch interactions. Prioritize essential information and simplify complex tasks.
- Seamless Booking Process: Streamline the booking process to minimize the number of steps required. Allow users to save their preferences and payment information for faster checkout.
- User Feedback and Reviews: Integrate user reviews and ratings to build trust and provide social proof. Make it easy for users to leave feedback and contact support.
- Personalization: Personalize the user experience by suggesting relevant services or accommodations based on their past bookings and preferences. Implement features like saved searches and favorites.
- Accessibility: Ensure the app is accessible to users with disabilities. Follow accessibility guidelines, such as providing alternative text for images and using sufficient color contrast.
Choosing the Right Technologies
In the development of a mobile booking application, selecting the appropriate technologies is crucial for ensuring performance, scalability, and a positive user experience. This involves careful consideration of both the frontend (user interface) and the backend (server-side) components. This section focuses on the backend development, which is the engine that powers the application.
Backend Development: The Core Functionality
The backend of a booking application serves as its operational backbone. It handles data storage, user authentication, API management, and other essential functionalities. Its role is to provide a reliable and efficient system for managing bookings, user data, and all associated transactions.The backend performs the following key functions:
- Data Storage: This involves storing all the necessary data, including user profiles, booking details, availability information, and payment records. Databases like PostgreSQL, MySQL, or MongoDB are commonly used for this purpose.
- API Management: APIs (Application Programming Interfaces) act as the communication channels between the mobile app frontend and the backend. They define how the frontend requests data and interacts with the backend services. API management includes creating, managing, and securing these APIs.
- User Authentication and Authorization: This secures the application by verifying user identities (authentication) and controlling access to different features and data based on user roles (authorization). Methods like password-based login, social media login, and multi-factor authentication are employed.
- Business Logic Implementation: This involves implementing the core business rules of the booking application, such as calculating prices, managing availability, processing payments, and generating confirmations.
- Notifications and Communications: The backend is responsible for sending notifications to users, such as booking confirmations, reminders, and updates. This can involve email, SMS, and push notifications.
Popular Backend Technologies and Frameworks
Several technologies and frameworks are popular choices for backend development, each with its own strengths and weaknesses. Choosing the right technology depends on the project requirements and the development team’s expertise.Here are some of the most commonly used backend technologies and frameworks:
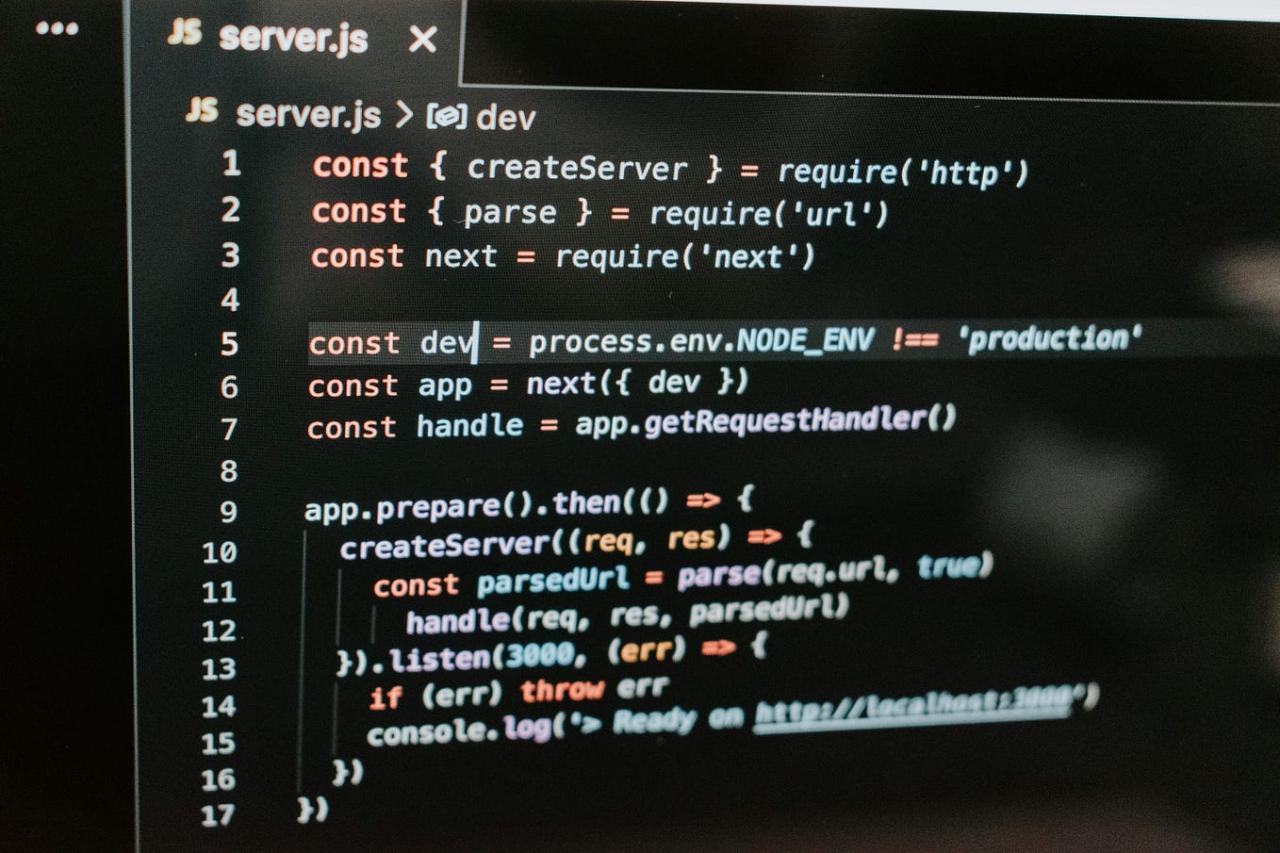
- Node.js: Node.js is a JavaScript runtime environment that allows developers to build scalable and efficient server-side applications. It is known for its non-blocking, event-driven architecture, making it suitable for handling a large number of concurrent requests. Frameworks like Express.js simplify development by providing tools for routing, middleware, and other functionalities. Node.js is a good choice for applications that require real-time features and fast performance.
- Python/Django: Python is a versatile programming language known for its readability and ease of use. Django is a high-level Python web framework that simplifies web application development. Django provides a robust set of features, including an ORM (Object-Relational Mapper) for database interaction, a templating engine, and built-in security features. It’s suitable for building complex applications with a rapid development cycle.
A common example of a Django-based booking system is the backend of Eventbrite.
- Ruby on Rails: Ruby on Rails (often shortened to Rails) is a web application framework written in Ruby. It emphasizes convention over configuration and promotes rapid development. Rails is known for its productivity and its “Don’t Repeat Yourself” (DRY) principle, making it efficient for building complex applications. Platforms like Airbnb initially used Ruby on Rails for its backend, which contributed to its quick growth and feature implementation.
- Java/Spring: Java is a widely used, robust, and platform-independent programming language. The Spring framework is a comprehensive Java framework for building enterprise applications. Spring provides features for dependency injection, aspect-oriented programming, and data access. It’s a good choice for building large, scalable, and complex applications that require high performance and reliability. Many enterprise-level booking systems and travel agencies, such as those used by major airlines, rely on Java/Spring for their backend infrastructure.
Selection Criteria for Backend Technology
Choosing the right backend technology requires careful consideration of several factors. These criteria influence the application’s scalability, performance, and the overall development process.Key factors to consider when selecting a backend technology:
- Scalability: The ability of the backend to handle increasing user traffic and data volume is crucial. The chosen technology should be able to scale horizontally (adding more servers) or vertically (upgrading server resources) as needed. Consider the architecture and the scalability features of the technology. For example, Node.js is often chosen for its scalability in handling many concurrent connections.
- Performance: The speed and efficiency of the backend directly impact the user experience. The technology should be able to process requests quickly and efficiently, minimizing latency. Consider the performance characteristics of the language, framework, and database, as well as the optimization techniques available. For example, Java/Spring is often selected for its high performance and ability to handle complex operations efficiently.
- Development Time: The time it takes to develop the backend is a critical factor. Consider the framework’s ease of use, the availability of libraries and tools, and the development team’s expertise. Frameworks that promote rapid development, such as Django and Ruby on Rails, can significantly reduce development time.
- Cost: The total cost of development includes the cost of the technology, development team salaries, and server infrastructure. Consider the licensing costs, the availability of open-source alternatives, and the scalability of the chosen technology.
- Community and Support: The size and activity of the technology’s community and the availability of support resources can significantly impact the development process. A large and active community provides access to documentation, tutorials, and troubleshooting assistance.
- Security: Security is paramount for booking applications. The technology should provide built-in security features and allow for the implementation of security best practices. Consider the security vulnerabilities of the technology and the available security libraries and tools.
Database Design and Implementation
A robust database is the backbone of any successful booking application. It’s where all the crucial information—user details, service listings, booking schedules, and availability—is securely stored and managed. The design of this database directly impacts the app’s performance, scalability, and overall user experience. A well-designed database ensures data integrity, efficient retrieval, and the ability to handle a growing volume of data as the app gains users and services.
This section details the essential considerations for designing and implementing a database for your booking application.
Importance of Database Design for a Booking App
Database design is critical because it affects nearly every aspect of a booking application’s functionality. Proper design ensures data consistency, prevents redundancy, and allows for efficient querying and retrieval of information. This, in turn, translates to faster loading times, improved user satisfaction, and the ability to scale the application as it grows. Consider the implications of poor database design: slow booking processes, inaccurate availability information, and difficulty in generating reports or analytics.
These issues can severely damage the user experience and hinder business growth.
Database Schema Structure for Booking Data
Creating a well-structured database schema is essential for organizing the information needed by your booking application. This involves defining tables, their respective columns (fields), and the relationships between them. Here’s a suggested schema structure, providing a foundation for various booking scenarios:
A database schema for a booking app typically comprises several key tables, each designed to store specific types of data.
This structure is crucial for organizing and managing the information required for bookings, user management, and service details.
- Users Table: This table stores user-specific information.
- user_id (INT, Primary Key, Auto-increment): Unique identifier for each user.
- first_name (VARCHAR): User’s first name.
- last_name (VARCHAR): User’s last name.
- email (VARCHAR, Unique): User’s email address.
- password (VARCHAR): User’s hashed password.
- phone_number (VARCHAR): User’s phone number.
- created_at (TIMESTAMP): Timestamp of user registration.
- updated_at (TIMESTAMP): Timestamp of the last update to the user’s profile.
- Services Table: This table contains information about the services offered.
- service_id (INT, Primary Key, Auto-increment): Unique identifier for each service.
- service_name (VARCHAR): Name of the service (e.g., “Haircut”, “Massage”).
- description (TEXT): Detailed description of the service.
- category (VARCHAR): Service category (e.g., “Hair”, “Spa”).
- price (DECIMAL): Price of the service.
- provider_id (INT, Foreign Key referencing Users): ID of the service provider.
- duration (INT): Duration of the service in minutes.
- created_at (TIMESTAMP): Timestamp of service creation.
- updated_at (TIMESTAMP): Timestamp of the last update to the service.
- Bookings Table: This table stores the booking details.
- booking_id (INT, Primary Key, Auto-increment): Unique identifier for each booking.
- user_id (INT, Foreign Key referencing Users): ID of the user who made the booking.
- service_id (INT, Foreign Key referencing Services): ID of the booked service.
- booking_date (DATE): Date of the booking.
- booking_time (TIME): Time of the booking.
- status (VARCHAR): Booking status (e.g., “pending”, “confirmed”, “completed”, “cancelled”).
- notes (TEXT): Any notes related to the booking.
- created_at (TIMESTAMP): Timestamp of booking creation.
- updated_at (TIMESTAMP): Timestamp of the last update to the booking.
- Availability Table: This table manages the availability of services.
- availability_id (INT, Primary Key, Auto-increment): Unique identifier for each availability slot.
- service_id (INT, Foreign Key referencing Services): ID of the service.
- provider_id (INT, Foreign Key referencing Users): ID of the service provider.
- available_date (DATE): Date of availability.
- start_time (TIME): Start time of the available slot.
- end_time (TIME): End time of the available slot.
- is_available (BOOLEAN): Indicates if the slot is available (true) or booked (false).
- created_at (TIMESTAMP): Timestamp of availability slot creation.
- updated_at (TIMESTAMP): Timestamp of the last update to the availability slot.
This schema is a starting point, and you can customize it based on the specific requirements of your booking application. For example, you might add tables for payments, reviews, or service locations.
SQL vs. NoSQL Database Options for a Booking Application
Choosing between SQL and NoSQL databases involves understanding their strengths and weaknesses in the context of a booking application. Both have their advantages, and the best choice depends on your specific needs and priorities.
SQL databases, also known as relational databases, excel at handling structured data and enforcing data integrity through predefined schemas. NoSQL databases, on the other hand, offer greater flexibility and scalability, particularly for handling unstructured or semi-structured data.
- SQL Databases:
- Data Integrity: SQL databases enforce data integrity through schemas, constraints, and relationships, reducing the risk of inconsistent data.
- ACID Transactions: SQL databases support ACID transactions, ensuring data reliability in the face of errors or failures.
- Mature Ecosystem: SQL databases have a mature ecosystem with extensive tools, libraries, and community support.
- Complex Queries: SQL databases are designed for complex queries and joins, allowing for sophisticated data analysis.
- Scalability Challenges: Scaling SQL databases horizontally can be complex and may require significant effort.
- Schema Rigidity: Changing the database schema can be challenging and may require downtime.
- Less Flexibility: SQL databases are less flexible when it comes to handling unstructured or semi-structured data.
- NoSQL Databases:
- Scalability: NoSQL databases are designed for horizontal scalability, making it easier to handle growing data volumes and user traffic.
- Flexibility: NoSQL databases offer greater flexibility in terms of data models, allowing for easier adaptation to changing requirements.
- High Availability: NoSQL databases often provide built-in support for high availability and fault tolerance.
- Data Consistency: NoSQL databases may not always provide the same level of data consistency as SQL databases.
- Query Complexity: Querying can be more complex and may require more specialized skills.
- Maturity: While NoSQL databases are rapidly evolving, the ecosystem may not be as mature as that of SQL databases.
SQL databases (e.g., MySQL, PostgreSQL) are well-suited for applications where data consistency and complex relationships are critical. Their structured nature and support for ACID (Atomicity, Consistency, Isolation, Durability) transactions ensure data reliability.
Advantages:
Disadvantages:
NoSQL databases (e.g., MongoDB, Cassandra) are designed for flexibility and scalability. They are particularly well-suited for applications that require high availability, handle large volumes of data, and have evolving data models.
Advantages:
Disadvantages:
Choosing between SQL and NoSQL involves considering the trade-offs between data integrity, scalability, and flexibility. For many booking applications, a relational database (SQL) might be a suitable choice due to its strong data integrity features. However, if the application needs to handle extremely high volumes of data or requires a highly flexible data model, a NoSQL database could be a better fit.
Consider the specific needs of your application and evaluate the strengths and weaknesses of each approach before making a decision.
Setting up the Development Environment
Setting up the development environment is a crucial step in the mobile app development process. It involves installing and configuring the necessary tools and software that will be used to write, test, and deploy the booking application. The specific tools required will depend on the chosen frontend and backend technologies. This section provides a comprehensive guide to setting up the development environment.
Installing and Configuring Essential Tools
Before commencing development, several essential tools need to be installed and configured. These tools form the foundation for writing and testing the mobile app.
- Integrated Development Environment (IDE): An IDE provides a comprehensive environment for software development. It typically includes a code editor, debugger, and build automation tools.
- For Android development using Java or Kotlin, Android Studio is the recommended IDE. It is specifically designed for Android app development and provides a wealth of features to streamline the development process. Android Studio is available for Windows, macOS, and Linux.
- For iOS development using Swift or Objective-C, Xcode is the primary IDE. It is developed by Apple and provides a complete suite of tools for building and debugging iOS applications. Xcode is available only for macOS.
- For cross-platform development, where the same codebase can be used for both Android and iOS, popular choices include:
- React Native: Uses JavaScript and React to build native mobile apps. Developers can use their existing JavaScript knowledge to create user interfaces and interact with native device features.
- Flutter: A UI toolkit by Google for building natively compiled applications for mobile, web, and desktop from a single codebase. It uses the Dart programming language.
- Xamarin: A Microsoft-owned platform for building cross-platform apps with C#.
- Software Development Kit (SDK): An SDK provides the necessary tools, libraries, and documentation to develop applications for a specific platform.
- Android SDK: Includes the Android platform, build tools, and various libraries. The Android SDK is typically installed and managed through Android Studio.
- iOS SDK: Includes the iOS platform, development tools, and frameworks. The iOS SDK is included with Xcode.
- SDKs for cross-platform frameworks (React Native, Flutter, Xamarin) are often integrated into the IDE or installed separately.
- Emulators and Simulators: These tools allow developers to test their apps on different devices and screen sizes without needing physical devices.
- Android Emulator: Integrated into Android Studio, allowing developers to emulate various Android devices and versions.
- iOS Simulator: Included with Xcode, enabling developers to simulate various iOS devices and versions.
- Emulators and simulators are crucial for testing the app’s functionality and user interface across a range of devices before deployment.
- Version Control System (e.g., Git): A version control system is essential for tracking changes to the codebase, collaborating with other developers, and reverting to previous versions if necessary. Git is a popular choice, and platforms like GitHub, GitLab, and Bitbucket provide hosting services for Git repositories.
- Backend Technologies: The choice of backend technologies will influence the development environment setup.
- Node.js: If using Node.js for the backend, install Node.js and npm (Node Package Manager).
- Python (with Django or Flask): If using Python for the backend, install Python and a package manager like pip.
- Java (with Spring Boot): If using Java for the backend, install the Java Development Kit (JDK) and an IDE like IntelliJ IDEA.
Configuring the Development Environment for Frontend and Backend
The configuration steps for the development environment depend on the chosen frontend and backend technologies. The following provides guidance for several common scenarios.
- Android (Kotlin/Java) and a REST API Backend:
- Frontend (Android Studio):
- Install Android Studio.
- Install the Android SDK through Android Studio’s SDK Manager. Choose the appropriate Android SDK versions for your target devices.
- Set up an Android emulator or connect a physical Android device for testing.
- Configure the build system (Gradle or Kotlin DSL) to manage dependencies.
- Backend (Node.js with Express, for example):
- Install Node.js and npm.
- Create a new project using `npm init`.
- Install Express.js and other necessary packages using `npm install express`.
- Write the backend code, defining API endpoints to handle requests from the mobile app.
- Test the API using tools like Postman or a web browser.
- Frontend (Android Studio):
- iOS (Swift) and a REST API Backend:
- Frontend (Xcode):
- Install Xcode.
- Create a new Xcode project.
- Use Swift or Objective-C to develop the iOS app.
- Set up an iOS simulator or connect a physical iOS device for testing.
- Manage dependencies using Swift Package Manager, CocoaPods, or Carthage.
- Backend (Python with Django REST Framework, for example):
- Install Python and pip.
- Create a new Django project using `django-admin startproject myproject`.
- Install Django REST Framework using `pip install djangorestframework`.
- Define API endpoints using Django REST Framework’s serializers and views.
- Test the API using tools like Postman or a web browser.
- Frontend (Xcode):
- Cross-Platform (React Native) and a REST API Backend:
- Frontend (React Native):
- Install Node.js and npm or yarn.
- Install the React Native CLI globally: `npm install -g react-native-cli` or `yarn global add react-native-cli`.
- Create a new React Native project: `react-native init myBookingApp`.
- Install the necessary dependencies.
- Set up an Android emulator or iOS simulator, or connect a physical device.
- Use the React Native development server to run the app on the emulator or device.
- Backend (Java with Spring Boot, for example):
- Install the Java Development Kit (JDK).
- Install an IDE like IntelliJ IDEA.
- Create a new Spring Boot project.
- Define API endpoints using Spring MVC or Spring WebFlux.
- Test the API using tools like Postman or a web browser.
- Frontend (React Native):
Creating a Basic “Hello, World!” App
The “Hello, World!” app is a fundamental step in verifying that the development environment is correctly configured. This section provides the steps for creating a basic “Hello, World!” app for Android, iOS, and React Native.
- Android (Kotlin/Java):
- Open Android Studio.
- Create a new project and select an “Empty Activity” template.
- In the `activity_main.xml` layout file, add a `TextView` to display the text. The layout file defines the UI elements of the app.
- In the `MainActivity.kt` (or `MainActivity.java`) file, find the `TextView` using its ID and set its text to “Hello, World!”. The activity file contains the logic for the app.
- Build and run the app on an emulator or a connected Android device.
- The app should display “Hello, World!” on the screen.
- iOS (Swift):
- Open Xcode.
- Create a new project and select “App” under iOS.
- In the `ContentView.swift` file, modify the `Text` view to display “Hello, World!”. The `ContentView.swift` file defines the UI for the app.
- Build and run the app on a simulator or a connected iOS device.
- The app should display “Hello, World!” on the screen.
- React Native:
- Navigate to your React Native project directory in the terminal.
- Open the `App.js` file.
- Modify the text content within the `Text` component to display “Hello, World!”.
- Run the app on an emulator or a connected device using the command `npx react-native run-android` (for Android) or `npx react-native run-ios` (for iOS).
- The app should display “Hello, World!” on the screen.
These simple examples demonstrate the core functionality of setting up the development environment. By successfully creating and running a “Hello, World!” app, you can be sure that the necessary tools and configurations are working correctly. This is the initial step toward building more complex mobile applications, such as the booking app.
User Authentication and Authorization
Securing user data and controlling access within a booking app is paramount. Implementing robust authentication and authorization mechanisms ensures the privacy of user information, prevents unauthorized access to sensitive data like booking details and payment information, and maintains the integrity of the application. These security measures build trust with users and are crucial for the app’s success.
Importance of Secure User Authentication
Secure user authentication is fundamental to the operation and trustworthiness of a booking application. It serves several critical purposes.
- Data Protection: Secure authentication safeguards user data, including personal details, booking history, and payment information. This protection prevents unauthorized access and potential data breaches.
- Preventing Fraud: Strong authentication methods make it significantly harder for malicious actors to create fake accounts or exploit existing ones for fraudulent activities, such as making unauthorized bookings or stealing payment information.
- User Trust: Robust security measures signal to users that their data is valued and protected. This builds trust and encourages user engagement with the app.
- Compliance: Adhering to data privacy regulations (e.g., GDPR, CCPA) necessitates secure authentication to protect user data. Compliance reduces the risk of legal penalties.
- Business Continuity: Preventing unauthorized access to the application and its data ensures that the app can continue to operate smoothly and provide services to its users.
Methods for Implementing User Authentication
Various methods can be used to implement user authentication, each with its own strengths and weaknesses. The choice of method should be based on factors such as security requirements, user experience, and development complexity.
- Username/Password Authentication: This is a common and straightforward method. Users create an account with a username and password. The application stores a hashed version of the password (using algorithms like bcrypt or Argon2) to verify the user’s identity upon login. It is important to enforce strong password policies (minimum length, complexity requirements) to enhance security.
- Multi-Factor Authentication (MFA): MFA adds an extra layer of security by requiring users to provide a second form of verification, in addition to their username and password. This can include a code sent to their email or phone (via SMS or an authenticator app), or biometric verification (fingerprint, facial recognition). MFA significantly reduces the risk of account compromise.
- Social Login: Social login allows users to authenticate using their existing accounts from social media platforms like Google, Facebook, or Twitter. This simplifies the signup and login process for users, as they don’t need to create a separate account. It’s essential to carefully handle the data received from social login providers and adhere to their terms of service.
- Biometric Authentication: This method utilizes unique biological traits, such as fingerprints or facial recognition, to verify a user’s identity. Biometric authentication is considered highly secure and provides a seamless user experience.
- Token-Based Authentication (e.g., JWT): In token-based authentication, the server issues a token (e.g., a JSON Web Token or JWT) to the user after successful authentication. This token is then included in subsequent requests to authenticate the user. This method is particularly well-suited for building APIs and stateless applications.
Designing a System for Managing User Roles and Permissions
A robust authorization system is necessary to control user access to different features and data within the booking app. This is achieved by defining user roles and assigning permissions to each role.
- Defining User Roles: Common roles in a booking app include:
- Admin: Has full access to all features and data, including managing users, bookings, settings, and content.
- User: Can make bookings, view their booking history, manage their profile, and potentially interact with customer support.
- Vendor/Service Provider: Can manage their listings (e.g., hotels, flights, activities), view booking details related to their listings, and potentially interact with customers.
- Assigning Permissions: Permissions define what actions each role is allowed to perform. For example:
- Admin: Can create, read, update, and delete all data.
- User: Can create bookings, read their booking history, update their profile.
- Vendor/Service Provider: Can read booking details related to their listings, update their listing information.
- Implementation Methods:
- Role-Based Access Control (RBAC): This is a common and effective approach. Users are assigned to roles, and permissions are assigned to roles. This simplifies access management.
- Attribute-Based Access Control (ABAC): This more advanced approach allows access control decisions to be based on attributes of the user, the resource being accessed, and the environment. This provides greater flexibility.
- Implementation Example: Consider a database table for roles and permissions.
Role ID Role Name Description 1 Admin Full access to all features 2 User Standard user with booking capabilities 3 Vendor Service provider with listing management And a table to link roles to permissions:
Permission ID Permission Name Description 1 Create Booking Allows the user to create a new booking 2 View Booking History Allows the user to view their booking history 3 Manage Listings Allows the vendor to manage their listings - Access Control Checks: Before allowing a user to perform an action, the application should check their role and permissions. This typically involves retrieving the user’s role from the database and comparing it to the required permissions for the action.
Booking Functionality

Implementing robust booking functionality is at the heart of any successful booking app. This section details the core steps involved in creating a seamless booking experience for users, from service selection to payment processing. We’ll delve into the intricacies of integrating calendars, scheduling systems, and secure payment gateways to ensure a user-friendly and reliable platform.
Creating the Booking Process
The booking process should be intuitive and guide the user through each step. A well-designed flow increases user satisfaction and reduces booking abandonment rates.
The typical booking process involves these key stages:
- Service Selection: The user chooses the desired service or product from a list or catalog. This might involve filtering options based on category, location, or other criteria. The user should be able to easily browse through available services, and each service should have a clear description, pricing, and any relevant details. For example, if booking a hotel room, the user would select room type, number of guests, and any other relevant amenities.
- Date and Time Selection: After selecting a service, the user specifies the date and time for the booking. This typically involves an interactive calendar or scheduling system, which we’ll explore in detail below. The system should display available slots and prevent users from selecting unavailable times. If a service has multiple providers (e.g., a hairstylist), the user may also need to select a specific provider.
- Confirmation and Review: The user is presented with a summary of their booking, including the service, date, time, and total cost. This is an opportunity for the user to review their selections and make any necessary changes. This screen should also include any applicable terms and conditions or cancellation policies.
- User Information (Optional): Depending on the service, the user might need to provide additional information, such as their name, contact details, or any special requests. This step should be streamlined to avoid unnecessary friction.
- Payment: The user enters their payment information and authorizes the transaction. This is where the payment gateway integration comes into play, which we’ll cover in detail.
- Booking Confirmation: Upon successful payment, the user receives a booking confirmation, typically via email or within the app. This confirmation should include all the booking details, such as the service, date, time, location, and confirmation number.
Integrating a Calendar or Scheduling System
Integrating a calendar or scheduling system is crucial for managing availability and providing a real-time view of booking slots. This ensures that users can only book available times and reduces the risk of overbooking.
Consider these key aspects when integrating a calendar or scheduling system:
- Calendar Selection: Choose a calendar library or API that integrates well with your chosen development platform (e.g., React Native, Flutter, iOS Swift, Android Java/Kotlin). Several open-source and commercial options are available. Consider factors such as ease of use, features, and support.
- Availability Management: Implement a system to track service availability. This could involve storing availability data in your database or using a third-party scheduling service. The system should be able to handle various scenarios, such as:
- Time Slots: Define time slots for each service and provider.
- Blocked Dates: Allow for blocking specific dates or times for holidays, vacations, or other unavailable periods.
- Buffer Times: Incorporate buffer times between bookings to allow for preparation and cleaning.
- Real-Time Updates: Ensure that the calendar updates in real-time to reflect new bookings and cancellations. This may involve using web sockets or other real-time communication technologies.
- User Interface (UI) Design: Design a user-friendly calendar interface. This should allow users to easily view available time slots, select their desired time, and see a clear representation of the booking’s duration. Provide clear visual cues to indicate availability and unavailability. For example, use different colors to represent booked and available slots.
- Synchronization: Implement synchronization with external calendars, such as Google Calendar or Outlook Calendar, to allow providers to manage their bookings across multiple platforms. This can be achieved using APIs provided by these calendar services.
Implementing Payment Gateway Integration
Integrating a payment gateway is essential for processing payments securely and reliably. Choose a payment gateway that offers a good balance of features, security, and cost.
Here’s a breakdown of the implementation process:
- Payment Gateway Selection: Research and select a suitable payment gateway, such as Stripe, PayPal, or Braintree. Consider factors such as:
- Supported Payment Methods: Ensure the gateway supports the payment methods your target audience uses (e.g., credit cards, debit cards, digital wallets).
- Security: The gateway should comply with industry security standards, such as PCI DSS.
- Fees: Compare the fees charged by different gateways.
- Ease of Integration: Choose a gateway with clear documentation and easy-to-use APIs and SDKs.
- Global Reach: Consider the gateway’s ability to process payments in multiple currencies and regions if your app targets an international audience.
- API Integration: Integrate the payment gateway’s API into your app. This involves:
- Setting up an Account: Create an account with the chosen payment gateway.
- Obtaining API Keys: Obtain API keys for testing and production environments.
- Using SDKs or Libraries: Utilize the payment gateway’s SDKs or libraries to handle payment processing tasks, such as creating payment intents, processing transactions, and handling refunds.
- Payment Processing Flow: Implement the following payment processing flow:
- Collect Payment Information: Securely collect the user’s payment information (credit card details, etc.) within your app. Avoid storing sensitive payment information directly. Use the payment gateway’s secure payment forms or SDKs to handle this.
- Create a Payment Intent/Transaction: Use the payment gateway’s API to create a payment intent or initiate a transaction. This typically involves specifying the amount, currency, and other relevant details.
- Authorize and Capture Payment: Authorize the payment and capture the funds. This may involve different steps depending on the gateway and the type of payment.
- Handle Payment Status Updates: Implement logic to handle payment status updates (e.g., successful, failed, pending).
- Store Transaction Data: Store transaction details in your database for future reference, including the payment ID, amount, date, and status.
- Security and Compliance: Prioritize security and comply with industry regulations:
- PCI DSS Compliance: Ensure your app complies with the Payment Card Industry Data Security Standard (PCI DSS) if you handle credit card information directly. Alternatively, use a payment gateway that handles PCI DSS compliance for you.
- Data Encryption: Encrypt sensitive data, such as payment information, both in transit and at rest.
- Fraud Detection: Implement fraud detection mechanisms to identify and prevent fraudulent transactions.
- Testing and Monitoring: Thoroughly test the payment integration in a test environment before going live. Monitor payment transactions and address any issues promptly. Use test cards provided by the payment gateway to simulate transactions.
Notifications and Communication

A well-designed booking app thrives on seamless communication. Timely and relevant notifications are crucial for user engagement, satisfaction, and ultimately, the success of the platform. Effective communication ensures users are informed about their bookings, receive necessary updates, and can easily interact with the service. This section details the implementation of real-time notifications and communication features within a booking application.
Real-time Notifications and Communications
Real-time notifications and effective communication are fundamental to a positive user experience in any booking application. They keep users informed, reduce anxiety related to booking confirmations, and facilitate efficient interaction between users and the service provider. Without these features, users might miss important updates, leading to dissatisfaction and potential loss of business.
Push Notifications for Booking Confirmations, Reminders, and Updates
Push notifications are a critical component of a modern booking app, offering immediate updates and reminders directly to the user’s device. They improve the user experience by ensuring timely information delivery.
- Booking Confirmations: Immediately after a booking is made, a push notification should confirm the reservation details. This includes the booking ID, service provider, date, time, and any relevant specifics. For instance, a notification could read: “Your booking for a haircut with John Doe on October 26th at 2:00 PM has been confirmed. Booking ID: 123456.”
- Reminders: Send reminders to users before their scheduled booking. This helps to reduce no-shows and ensures the service provider is prepared. Reminders should be sent at an appropriate interval, such as 24 hours and 1 hour before the appointment. A reminder notification might state: “Reminder: Your appointment with John Doe for a haircut is scheduled for tomorrow, October 26th at 2:00 PM.”
- Updates: Provide users with updates regarding any changes to their bookings, such as cancellations, rescheduling, or service provider delays. This keeps users informed and minimizes potential disruptions. For example, a notification could inform: “Your appointment with John Doe has been rescheduled to October 26th at 3:00 PM due to unforeseen circumstances.”
Implementing push notifications typically involves these steps:
- Choosing a Push Notification Service: Select a reliable service such as Firebase Cloud Messaging (FCM) for Android and iOS, or other platform-specific services. FCM offers cross-platform compatibility and robust features.
- Integrating the SDK: Integrate the chosen SDK into your mobile app project. This involves following the platform-specific instructions to configure the service.
- Generating Device Tokens: Each device must generate a unique token, which the app then sends to the backend server. This token is used to target specific devices for notification delivery.
- Backend Implementation: Implement backend logic to send notifications. This typically involves storing device tokens, constructing notification payloads (message content, title, etc.), and using the push notification service’s API to send the notifications.
- Testing and Monitoring: Thoroughly test notifications on different devices and operating system versions. Monitor notification delivery rates and address any issues that arise.
In-App Messaging or Email Notifications
In addition to push notifications, in-app messaging and email notifications offer alternative communication channels. They provide flexibility and enable richer interactions.
- In-App Messaging: Incorporate an in-app messaging system to allow users to communicate directly with the service provider or the booking platform’s support team. This could be used for:
- Answering user questions about the booking.
- Providing updates or clarifying booking details.
- Handling customer service inquiries.
Implementing in-app messaging can be done through integrating a third-party messaging service or developing a custom solution.
- Email Notifications: Email notifications serve as a reliable communication channel, especially for users who may not have push notifications enabled.
- Booking Confirmation Emails: Send a detailed email confirmation immediately after a booking is made, including all relevant details.
- Reminder Emails: Send reminder emails a day or two before the appointment.
- Update Emails: Send emails regarding booking changes, cancellations, or other important updates.
Email notifications should be designed with a clear and professional layout, ensuring that all important information is easily accessible. Using a service like SendGrid or Amazon SES can simplify the process of sending and managing email communications.
Testing and Debugging

Thorough testing and effective debugging are crucial for the success of any mobile booking application. They ensure the app functions as expected, provides a seamless user experience, and is free from critical errors that could lead to user frustration or data loss. A well-tested and debugged app is more reliable, maintainable, and ultimately, more likely to gain positive reviews and user adoption.
Importance of Thorough Testing
Testing validates that the application meets all specified requirements and functions correctly under various conditions. It identifies bugs, performance issues, and usability problems before the app is released to the public.
- User Satisfaction: Rigorous testing leads to a better user experience, resulting in higher user satisfaction.
- Bug Prevention: Early bug detection and fixing reduce the likelihood of critical issues appearing in the production environment.
- Cost Reduction: Fixing bugs during development is significantly less expensive than addressing them after the app is launched.
- Performance Optimization: Testing helps identify and resolve performance bottlenecks, ensuring a smooth and responsive user experience.
- Security Enhancement: Testing can uncover security vulnerabilities, protecting user data and privacy.
Types of Testing
Different testing methodologies are employed to ensure the app functions correctly from various angles. Each type of testing serves a specific purpose and contributes to the overall quality of the application.
- Unit Tests: Unit tests are the foundation of testing, focusing on individual components or modules of the application. They verify that each unit functions as designed in isolation. For example, a unit test might verify the logic within a function that calculates the total booking price. This involves feeding specific inputs to the function and comparing the output with the expected results.
- Integration Tests: Integration tests evaluate how different modules or components interact with each other. They ensure that these modules work together correctly when integrated. For example, an integration test might verify the communication between the user interface and the database when a user attempts to book a reservation.
- User Acceptance Testing (UAT): UAT is performed by real users or a representative group of users. It validates that the application meets the business requirements and is user-friendly. This testing phase involves users interacting with the application as they would in a real-world scenario, providing feedback on its functionality, usability, and overall experience.
- Functional Testing: This type of testing verifies that each feature and function of the app works as specified in the requirements. It covers areas such as booking functionality, payment processing, and user account management.
- Performance Testing: Performance testing evaluates the app’s performance under various conditions, such as high user load or slow network connections. It aims to identify and resolve performance bottlenecks.
- Security Testing: Security testing focuses on identifying vulnerabilities that could be exploited by malicious actors. This includes testing for common vulnerabilities such as SQL injection, cross-site scripting (XSS), and authentication flaws.
- Usability Testing: Usability testing evaluates how easy and intuitive the app is to use. This includes assessing the user interface, navigation, and overall user experience.
Debugging Process and Debugging Tools
Debugging is the process of identifying and resolving errors (bugs) in the application code. Effective debugging requires a systematic approach and the use of specialized tools.
- Identify the Problem: The first step is to reproduce the bug and gather as much information as possible about the issue, including the steps to reproduce it and any error messages.
- Isolate the Bug: The next step is to pinpoint the exact location of the bug within the code. This can be done by using debugging tools, such as debuggers, logging, and breakpoints.
- Analyze the Code: Once the bug’s location is identified, the developer needs to carefully analyze the code to understand why the bug is occurring.
- Fix the Bug: After understanding the cause of the bug, the developer can modify the code to correct the error.
- Test the Fix: After fixing the bug, it’s crucial to test the fix to ensure it resolves the issue without introducing new problems.
Debugging tools significantly assist in identifying and resolving issues within the application.
- Debuggers: Debuggers allow developers to step through the code line by line, inspect variables, and set breakpoints to pause execution at specific points. Popular debuggers include those integrated into IDEs like Android Studio (for Android development) and Xcode (for iOS development).
- Logging: Logging involves inserting statements into the code to record information about the application’s execution. This can help identify the sequence of events leading to a bug and the values of variables at various points. Logging libraries, like Log4j or the built-in logging mechanisms of the programming language, are frequently used.
- Profiling Tools: Profiling tools help identify performance bottlenecks by analyzing the application’s resource usage, such as CPU and memory consumption. These tools are essential for optimizing the app’s performance.
- Error Reporting Services: Services such as Firebase Crashlytics or Sentry automatically capture and report crashes and errors, providing detailed information about the issue and helping developers quickly identify and fix problems.
Deployment and Publishing

Deploying and publishing your booking app is the final step, making your creation available to users. This process involves preparing your app for app stores, submitting it, and monitoring its performance after launch. Successful deployment requires careful adherence to app store guidelines and ongoing monitoring to ensure a positive user experience.
Steps for Deploying to App Stores
The process of deploying your booking app to app stores, like the Google Play Store and the Apple App Store, involves several key steps. These steps ensure your app is correctly formatted, meets the required criteria, and is accessible to users.
- Prepare App for Release: Before submission, prepare your app for release. This includes removing debugging code, optimizing performance, and ensuring all features function correctly. Also, you will need to create a release build of your application, which is an optimized version suitable for distribution.
- Create Developer Accounts: You’ll need developer accounts for both the Google Play Store (Google Play Console) and the Apple App Store (Apple Developer Program). These accounts require annual fees.
- Generate App Store Assets: Prepare necessary assets, including app icons, screenshots, and promotional videos. These elements are crucial for attracting users and showcasing your app’s features. Ensure that the images and videos meet the specific resolution and format requirements of each app store.
- Create a Privacy Policy and Terms of Service: A privacy policy and terms of service are essential for legal compliance and transparency with your users. These documents Artikel how you collect, use, and protect user data.
- Configure App Information: In the app store consoles, enter the app’s name, description, category, and s. Accurate and compelling descriptions and relevant s improve your app’s discoverability.
- Upload the App Package: Upload the app’s binary file (APK for Android, IPA for iOS) to the respective app store consoles. These files contain your app’s code and resources.
- Set Pricing and Distribution: Determine your app’s pricing model (free, paid, or freemium) and select the countries where you want to distribute your app.
- Submit for Review: Submit your app for review by the app store. The review process ensures that your app meets the store’s guidelines.
- Address Feedback and Resolve Issues: If your app is rejected, review the feedback provided by the app store and make necessary changes. Resubmit your app once the issues are resolved.
- Release the App: Once approved, you can release your app to the public. You can schedule the release date or make it immediately available.
App Store Submission Guidelines and Requirements
App stores have specific guidelines and requirements that apps must meet to be approved for distribution. Adhering to these guidelines is crucial for a successful launch. These guidelines cover various aspects, from content and functionality to user privacy and security.
- Content Guidelines: Apps must adhere to content guidelines that prohibit hate speech, violence, and illegal activities. The app’s content should be appropriate for the target audience.
- Functionality and Performance: The app must function as described and provide a positive user experience. Apps should be stable, responsive, and free of critical bugs.
- User Privacy: Apps must comply with user privacy regulations, such as GDPR and CCPA. This includes clearly stating data collection practices and obtaining user consent when required.
- Security: Apps must implement security best practices to protect user data and prevent unauthorized access. This includes secure coding practices and protection against common vulnerabilities.
- Monetization: If your app includes in-app purchases, you must use the app store’s payment processing system. Apps must also comply with rules regarding advertising and promotional content.
- App Store Specific Guidelines: Both Google and Apple have their own specific guidelines. For example, Apple requires apps to provide a way for users to delete their accounts, while Google focuses on Android-specific features and compatibility.
- Compliance with Legal Regulations: Ensure your app complies with all relevant legal regulations in the regions where you plan to distribute it. This may include regulations related to booking services, data privacy, and consumer protection.
Monitoring App Performance and User Feedback After Launch
After launching your booking app, continuously monitoring its performance and gathering user feedback is crucial for its success. This ongoing process helps you identify areas for improvement, address issues, and enhance the user experience. This process helps to ensure user satisfaction and app improvement.
- Monitor Key Metrics: Track key performance indicators (KPIs) such as downloads, active users, retention rates, conversion rates, and revenue. These metrics provide insights into your app’s overall performance.
- Analyze User Reviews and Ratings: Pay close attention to user reviews and ratings. These provide direct feedback on user experiences, and highlight strengths and weaknesses of the app. Respond to reviews to address user concerns and demonstrate your commitment to improvement.
- Utilize Analytics Tools: Integrate analytics tools, such as Google Analytics for Firebase or Apple App Analytics, to gain insights into user behavior, app usage patterns, and potential issues. These tools help you understand how users interact with your app.
- Monitor Crash Reports and Error Logs: Regularly review crash reports and error logs to identify and fix bugs. Promptly addressing technical issues is essential for maintaining a stable and reliable app.
- Gather User Feedback Through Surveys and In-App Feedback: Implement surveys and in-app feedback mechanisms to collect direct feedback from users. This helps you understand user preferences, identify pain points, and gather ideas for new features.
- Conduct A/B Testing: Perform A/B testing to experiment with different features, designs, and marketing messages. This data-driven approach helps you optimize your app for improved performance and user engagement.
- Update and Iterate Regularly: Based on the data collected and user feedback, regularly update your app with bug fixes, new features, and performance improvements. This continuous improvement cycle is key to long-term success.
Wrap-Up
In conclusion, creating a mobile app for booking requires a strategic blend of technical expertise, thoughtful design, and a keen understanding of user needs. From choosing the right technologies to deploying your app, each step presents opportunities for innovation and refinement. By following the guidelines Artikeld in this comprehensive guide, you are well-equipped to bring your vision to life and create a booking app that delights users and drives success.
Remember, the key lies in meticulous planning, diligent execution, and a commitment to continuous improvement.